Kitchen notes · a little help before you start
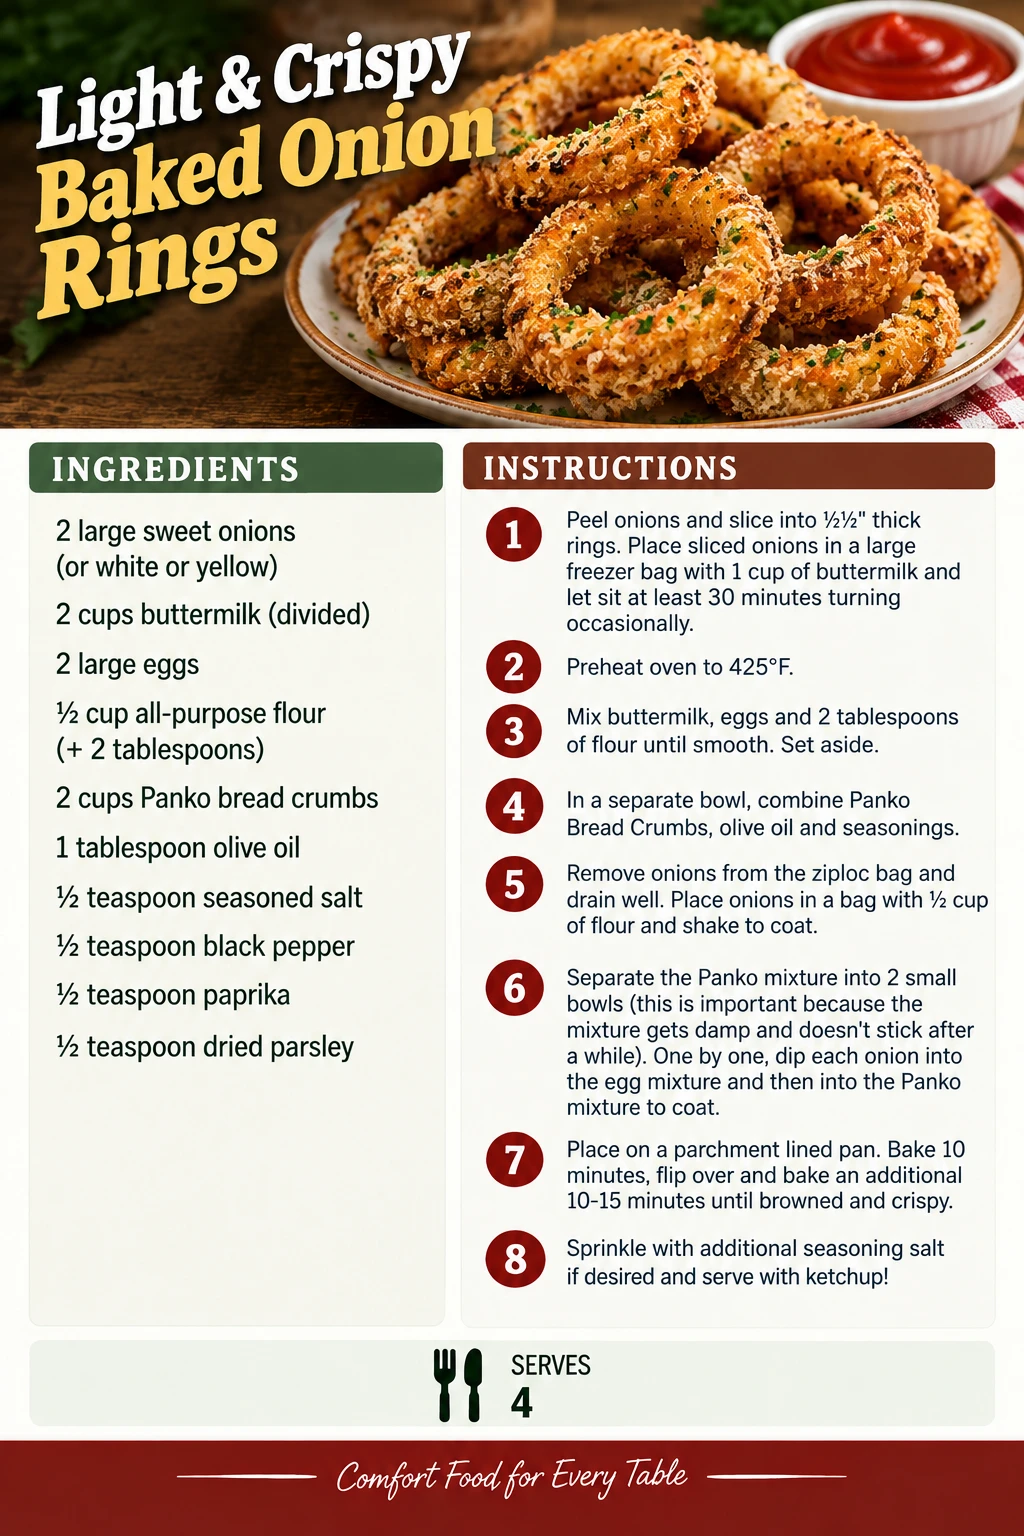
Light & Crispy Baked Onion Rings
Light & Crispy Baked Onion Rings brings together sweet onion, buttermilk, and eggs. Start with the oven-preheating step in the recipe. The quick notes will help you get the small jobs lined up before you start.
- Prep
- 20 min
- Cook
- 20 min
- Total
- 40 min
- Original yield
- Serves 4
- Ingredients
- 10 listed
Make it part of your week
Recipe categories & planning details
- Meal type
- Appetizers & snacks · Sides
- Cuisine
- American
- Cooking method
- Baked & roasted
- Preparation & total time
- Prep: 16–30 minutes · Total: 31–60 minutes
- Budget (estimated)
- Low cost
- Dietary characteristics
- Vegetarian
A few quick notes
1. Get the oven ready first
Start with the oven-preheating step in the recipe. Then use the preparation steps that follow to get the food ready for the hot oven.
2. Keep the mixtures separate until their step
The method prepares more than one mixture before bringing them together. Set out the separate bowls or containers it calls for, then combine them at the stated step.
3. Set up the coating steps in order
Read the coating sequence and set its ingredients out in that order. Keep the preparation and cooking steps separate so you can finish each piece the same way.
Get to know the ingredients
Sweet onion
Look at how this ingredient comes into the method: Peel onions and slice into ½½" thick rings.
Buttermilk
Look at how this ingredient comes into the method: Place sliced onions in a large freezer bag with 1 cup of buttermilk and let sit at least 30 minutes turning occasionally.
Eggs
Look at how this ingredient comes into the method: Mix buttermilk, eggs and 2 tablespoons of flour until smooth.
Let’s make it
Choose your servings, then check things off as you go.
Original recipe: Serves 4. Original quantities shown.
Check ingredients as you prepare them. These checks stay on this page.
How to make it
0 of 8 steps completeMake room for Light & Crispy Baked Onion Rings
Review ingredients in your pantry before anything is added. Meal plans use your household size; grocery-only additions use the servings selected above.
The last little job
Keep the last little job in mind
The recipe finishes with this step: Sprinkle with additional seasoning salt if desired and serve with ketchup! Set out what you need for that finish before the cooking gets busy.
A little more help as you go
Match the preparation in the method
Take a look at the chopping, slicing or shaving step before bringing the parts together. Use the preparation described there so the food goes into the next stage in the form the recipe expects.
Set out the finishing ingredient
Keep the finishing ingredient within reach while the main preparation is going on. Add it at the step in the method so the last job is easy to complete.
A few questions you might have
What should I get ready before starting?
Set out the oven. Read the first preparation step before you get going: Peel onions and slice into ½½" thick rings.
Which little step is worth remembering?
Start with the oven-preheating step in the recipe. Then use the preparation steps that follow to get the food ready for the hot oven.
What check should I look for as it cooks?
Keep this part of the method in view: Bake 10 minutes, flip over and bake an additional 10-15 minutes until browned and crispy.
Is there another preparation step to plan for?
Take a look at the chopping, slicing or shaving step before bringing the parts together. Use the preparation described there so the food goes into the next stage in the form the recipe expects.
Storage & reheating safety
For cooked, perishable leftovers, refrigerate within 2 hours (1 hour above 90°F), using shallow containers for prompt cooling. Keep the refrigerator at 40°F or below, use refrigerated leftovers within 3–4 days, and reheat hot leftovers to 165°F, checked with a food thermometer. Follow any shorter package limit.
These are general safety limits, not a tested storage or freezing recommendation for this particular dish. USDA leftovers guidance · Safe cooking temperatures
Recipe source: Spend With Pennies. Ingredient names and quantities may be adapted for the pantry.
Preparation notes follow the recipe shown here.
View saved recipe card
Fixed portions in this saved image. Use the recipe above for current ingredients and serving amounts.
Open full-size card ↗